How to: Make a Favicon and Add it to Your Blog
Hey, guys! Today I am going to be talking about how to make a favicon with a cool website that I use. As you guys can see, I just added favicons to all three of my blogs, and I was interested in telling people how to do it. BECAUSE IT IS CONFUSING
*****
1. FIND THE WEBSITE YOU ARE GOING TO USE
There are a LOT of options so you might want to think about which one you want to use. If you already have an image that you want to use for your favicon, then a good website would be Favicon Generator. If you don't have a picture and you want to start from scratch, a good website to use would be Favicon.ico. This website allows you to draw an image and then download that and put it on your website. This is the website I used, so this is the one that I will give a tutorial on because the other one is super easy.
2. CHOOSE A COLOR SCHEME
This is very important, especially if you want this to be more professional. Favicon.ico has all colors for you to use, including transparent, white, and black. For example, iRandom is a very pink, gray, white-themed, so I chose a silvery-gray for my background of my favicon. To do this, I chose the color I wanted and filled out the entire square that they give you on the website with that color.
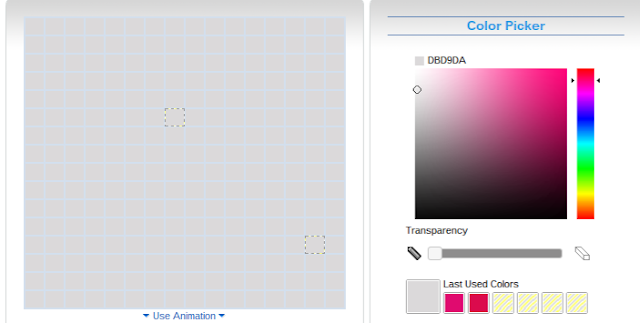
3. CHOOSE WHAT DESIGN YOU WANT.
I wanted to put my initials using a pink theme, one a light pink and one a hot pink. This would go along with the color scheme of my blog...
4. START COLORING THE FIRST PART OF YOUR DESIGN
I broke this up into "parts." The 'M' of my design was the first part, and the 'C' was my second part. The 'M' was going to be in hot pink. I didn't draw the 'M' at the edges... instead, I started a block in. There are 16 blocks in one row, so subtracting 2 from that is 14, and dividing that by 2 is 7, meaning that my 'M' can only be 7 blocks long.

5. START COLORING THE NEXT PART
Click a color that won't look terrible against the color you chose for the first part of your design. You might have to experiment a lot, as you can see from my screenshot up above.

6. REVISE AND EDIT IF NEEDED
Sometimes you might want to try something new, something different, maybe a changed color scheme or design, so feel free to edit what you have. It is also always a good idea to thicken your lines so it will actually show up on your blog. For my design, I'm going to keep it :D
7. DOWNLOAD YOUR DESIGN
This part is super easy! Scroll down, and click the "download favicon" button! It'll give you a preview of what it will look like on your website.

8. ADD IT TO YOUR BLOG
I'm going to show you how to add to your blog on BLOGGER. Go to your blog dashboard and click on "layout."

Then click the "edit" button on the Favicon gadget.

Then from there, click "remove" if you already have a favicon there, and then click "Choose File" to add a new one.
 Choose the downloaded favicon that you made and click "save." Your new favicon should now show up.
 Click "save arrangement" or preview your blog if needed.

9. VIEW BLOG
You should always view your own blog to see if it actually worked :D

10. YOU ARE DONE!
Yay! You made your own favicon and made your blog that much better XD
Hope you enjoyed this tutorial and comment down below if you made a favicon!!
*****
1. FIND THE WEBSITE YOU ARE GOING TO USE
There are a LOT of options so you might want to think about which one you want to use. If you already have an image that you want to use for your favicon, then a good website would be Favicon Generator. If you don't have a picture and you want to start from scratch, a good website to use would be Favicon.ico. This website allows you to draw an image and then download that and put it on your website. This is the website I used, so this is the one that I will give a tutorial on because the other one is super easy.
2. CHOOSE A COLOR SCHEME
This is very important, especially if you want this to be more professional. Favicon.ico has all colors for you to use, including transparent, white, and black. For example, iRandom is a very pink, gray, white-themed, so I chose a silvery-gray for my background of my favicon. To do this, I chose the color I wanted and filled out the entire square that they give you on the website with that color.

3. CHOOSE WHAT DESIGN YOU WANT.
I wanted to put my initials using a pink theme, one a light pink and one a hot pink. This would go along with the color scheme of my blog...
4. START COLORING THE FIRST PART OF YOUR DESIGN
I broke this up into "parts." The 'M' of my design was the first part, and the 'C' was my second part. The 'M' was going to be in hot pink. I didn't draw the 'M' at the edges... instead, I started a block in. There are 16 blocks in one row, so subtracting 2 from that is 14, and dividing that by 2 is 7, meaning that my 'M' can only be 7 blocks long.

5. START COLORING THE NEXT PART
Click a color that won't look terrible against the color you chose for the first part of your design. You might have to experiment a lot, as you can see from my screenshot up above.

6. REVISE AND EDIT IF NEEDED
Sometimes you might want to try something new, something different, maybe a changed color scheme or design, so feel free to edit what you have. It is also always a good idea to thicken your lines so it will actually show up on your blog. For my design, I'm going to keep it :D
7. DOWNLOAD YOUR DESIGN
This part is super easy! Scroll down, and click the "download favicon" button! It'll give you a preview of what it will look like on your website.

8. ADD IT TO YOUR BLOG
I'm going to show you how to add to your blog on BLOGGER. Go to your blog dashboard and click on "layout."

Then click the "edit" button on the Favicon gadget.

Then from there, click "remove" if you already have a favicon there, and then click "Choose File" to add a new one.


9. VIEW BLOG
You should always view your own blog to see if it actually worked :D

10. YOU ARE DONE!
Yay! You made your own favicon and made your blog that much better XD
Hope you enjoyed this tutorial and comment down below if you made a favicon!!

Comments
Post a Comment